So I build this E-Mail printer for my dad – https://blog.sebastian-martens.de/technology/email-printer/ to no longer read his mails for him. Of course you could do anything more useful or funny with it, than printing emails. Maybe printing the quote of the day. The weather forecast. Or any status updates.
- Raspberry Pi (all versions)
- Thermal Printer
- power supplies for the Raspberry and the Thermal printer
For the simple case let’s say we just use the standard USB-cable to power up the raspberry. For the Thermal printer you need a 5V power supply.
As we do not need much computing power the first raspberry pi version A is still ok. If you have a newer version, this is of course no problem.
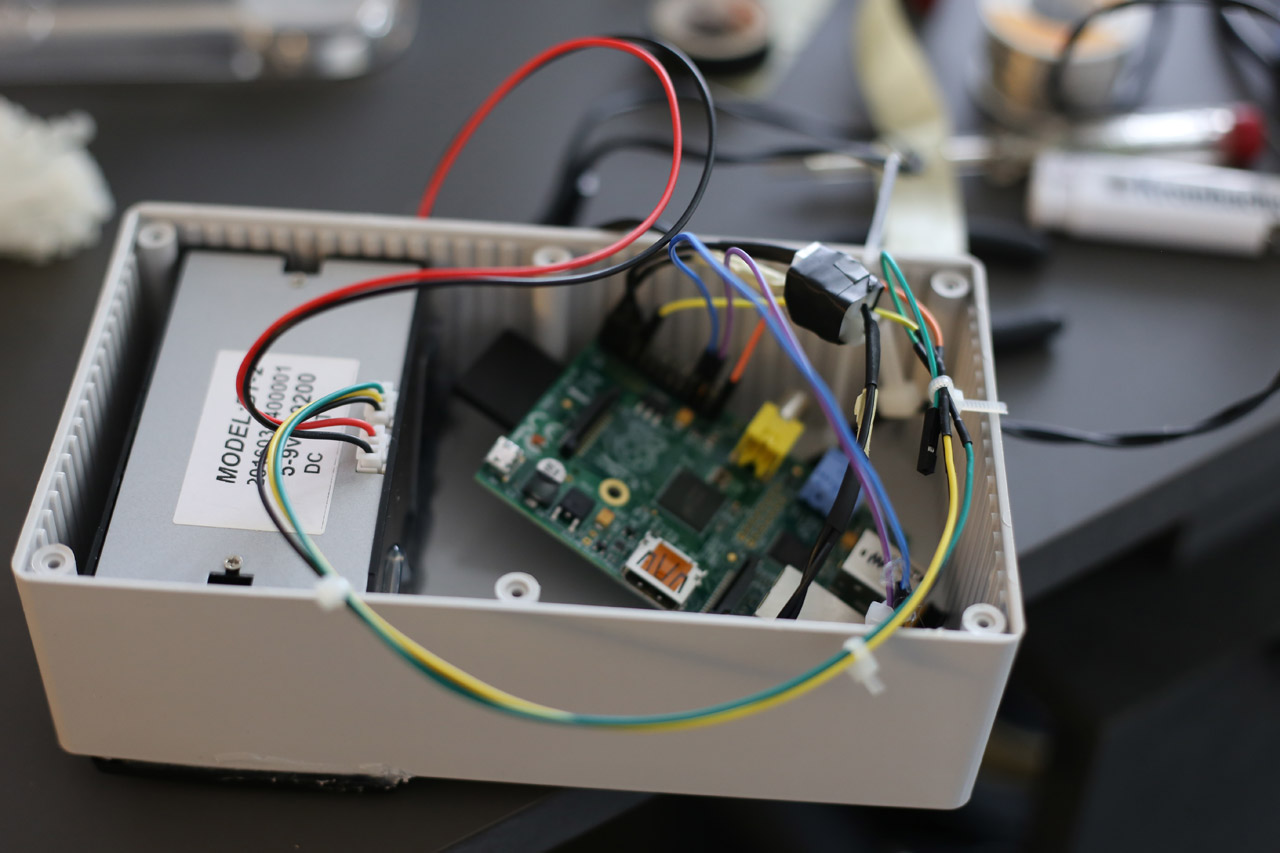
At first we need to connect the correct cabels. The black and red wire of the Thermal printer need to be connected to the universal power supply for the Thermal printer. Black is ground/mass and red is for the 5V positiv connector. When you connected the power correctly the green light should be flashing and you could press the top button and a little paper sheet should be pushed out of the printer.
Next connect the thermal printer to your raspberry pi. The yellow cable (RX) of the printer should be connected to PIN8 of the raspberry pi. The black cable (ground) should be connected to any ground PIN of the raspberry ( e.g. PIN6 ).
Now lets have a look at the software side. Make sure your raspberry is connected to the internet and has access. I prepared the raspberry pi SD with the NOOBS 2.0.0 Raspian Installer (https://www.raspberrypi.org/downloads/noobs/). After you installed the Raspian execute the following commands on the console:
First be sure you are in the default pi- user home directory
cd ~
Lets update the current software to the lastest version:
sudo apt-get update
Because I used an old mail script written in PHP we need PHP and the IMAP extension as well:
sudo apt-get install php php-imap python-serial git -y
All the code is available via github. So just checkout the code by using:
git clone git://github.com/dinnerout/raspimailprint.git
Switch in into the code directory:
cd raspimailprint
Now we need to make a the mail-script executable:
chmod +x fetchMails.sh
The last step is to configure your E-Mail access data. Do this in the config/config.php file.
cp config/example_config.php config/config.php

nano config/config.php
You need to update the lines EMAIL_SERVER, EMAIL_USER, EMAIL_PASSWORD. Make sure you checked the other settings. By default downloaded mails will be deleted from the server.
Now you are ready to execute the mail script and print your mails.
./fetchMails.sh
cheers.
Sebastian
Hi Sebastian
Is it necessary to install NOOBS 2.0.0? And where do i get it from?
I used Raspbian Buster and it doesnt work. I guess the reason is a different php version.
You use php5…and I installed php7.3.
As a result: ./fetchMails.sh doesnt execute since it cannot be found.
Any hint to solve this problem would be higly appreciated.
Thanks in advance
Does the Script scans after emails every 5 mins automatically? If not what would you suggested an crontab or job?
Can I also use a normal printer?
In general yes you could. But this would need a different code. I choose the small printer to not have an extra device and have less energy consumption.